文档
一个命令:
autooptm
在你自己的机器上优化,或者把项目交给我们的 GPU,都是同一个 autooptm。每一步——跑哪条命令、上传哪些文件、什么时候扣费——都会先展示给你,征得同意后再执行。
curl -fsSL https://autooptm.com/install.sh | sh一个文件,装进 ~/.local/binautooptm终端界面:先登录,再在本机优化autooptm run --cloud .或交给我们的 GPU:先免费估算安装
一条命令。它按你的系统(Linux 或 macOS,x86_64 或 arm64)下载对应的 autooptm,用公布的 SHA256 校验,放进 ~/.local/bin,不需要 root,也不改动机器上别的东西。
$ curl -fsSL https://autooptm.com/install.sh | sh
autooptm v0.1.0-beta… for linux/amd64
  checksum ok
  installed ~/.local/bin/autooptm (ao-cli is another name for it)
装到别处(比如给所有用户用):在 sh 前加 AUTOOPTM_INSTALL_DIR=/usr/local/bin,需要对那个目录有写权限。没有 curl 就用 wget -qO- https://autooptm.com/install.sh | sh。装好后 autooptm version 会显示版本号和它连的后端。
想先看脚本再运行:install.sh。也可以手动下载:SHA256SUMS 里列着每个平台的压缩包,在 dl/autooptm/ 下,解压出 autooptm 放进 PATH 即可。更新就是再跑一次安装命令;卸载就是删掉 ~/.local/bin/autooptm(和它的另一个名字 ao-cli),它自己的环境和缓存在 ~/.cache/autooptm-cli。Windows 暂不支持,可以在 WSL 里用 Linux 版。
autooptm?那个 Python 包已经停止更新,它的命令也叫 autooptm,排在 PATH 前面时会盖住新的这个。先 pipx uninstall autooptm(或 pip uninstall autooptm)。登录是同一个,不用重新登录。
登录
装好后第一件事是登录,本机和云端用的是同一个登录。直接打开 autooptm,没登录时整个界面就是登录页;或者 autooptm login。它会打开浏览器,在网页上批准这台机器即可。终端随即获得一个 30 天有效的令牌,每次使用自动续期,保存在 ~/.config/autooptm/token。
$ autooptm login
signed in as you@example.com; token saved to ~/.config/autooptm/token (valid 30 days, and it slides on use)

# a server with no browser: print the approval URL, open it anywhere
$ autooptm login --no-browser

# or the email code (QQ / 163 mail work): one command sends it, the next verifies
$ autooptm login --email you@example.com
$ autooptm login --email you@example.com --code 482913

$ autooptm balance
12.4 credits (≈ $12.4)
$ autooptm logout
CI 与脚本:API key
无法使用浏览器的场景,请用 API key。key 只显示一次;默认只有 read,submit 两项权限,unlock 会产生费用,需要显式授予。把它设到 AUTOOPTM_TOKEN 环境变量中,命令行会自动读取。
$ autooptm keys create "CI pipeline" --scopes read,submit --expires-in-days 90
$ autooptm keys list
$ autooptm keys revoke <keyId>
$ export AUTOOPTM_TOKEN=ao_…
在自己的机器上:autooptm beta
在你自己的机器上优化:代码、数据和显卡都留在本地,什么都不上传。优化 agent 在我们这边思考,需要读哪个文件、跑哪条命令,都通过你这台机器主动发起的连接来请求,每一步都显示在终端里。结束时你拿到一个补丁,用不用由你决定。没有显卡的机器也行,那就是一个 CPU 任务。
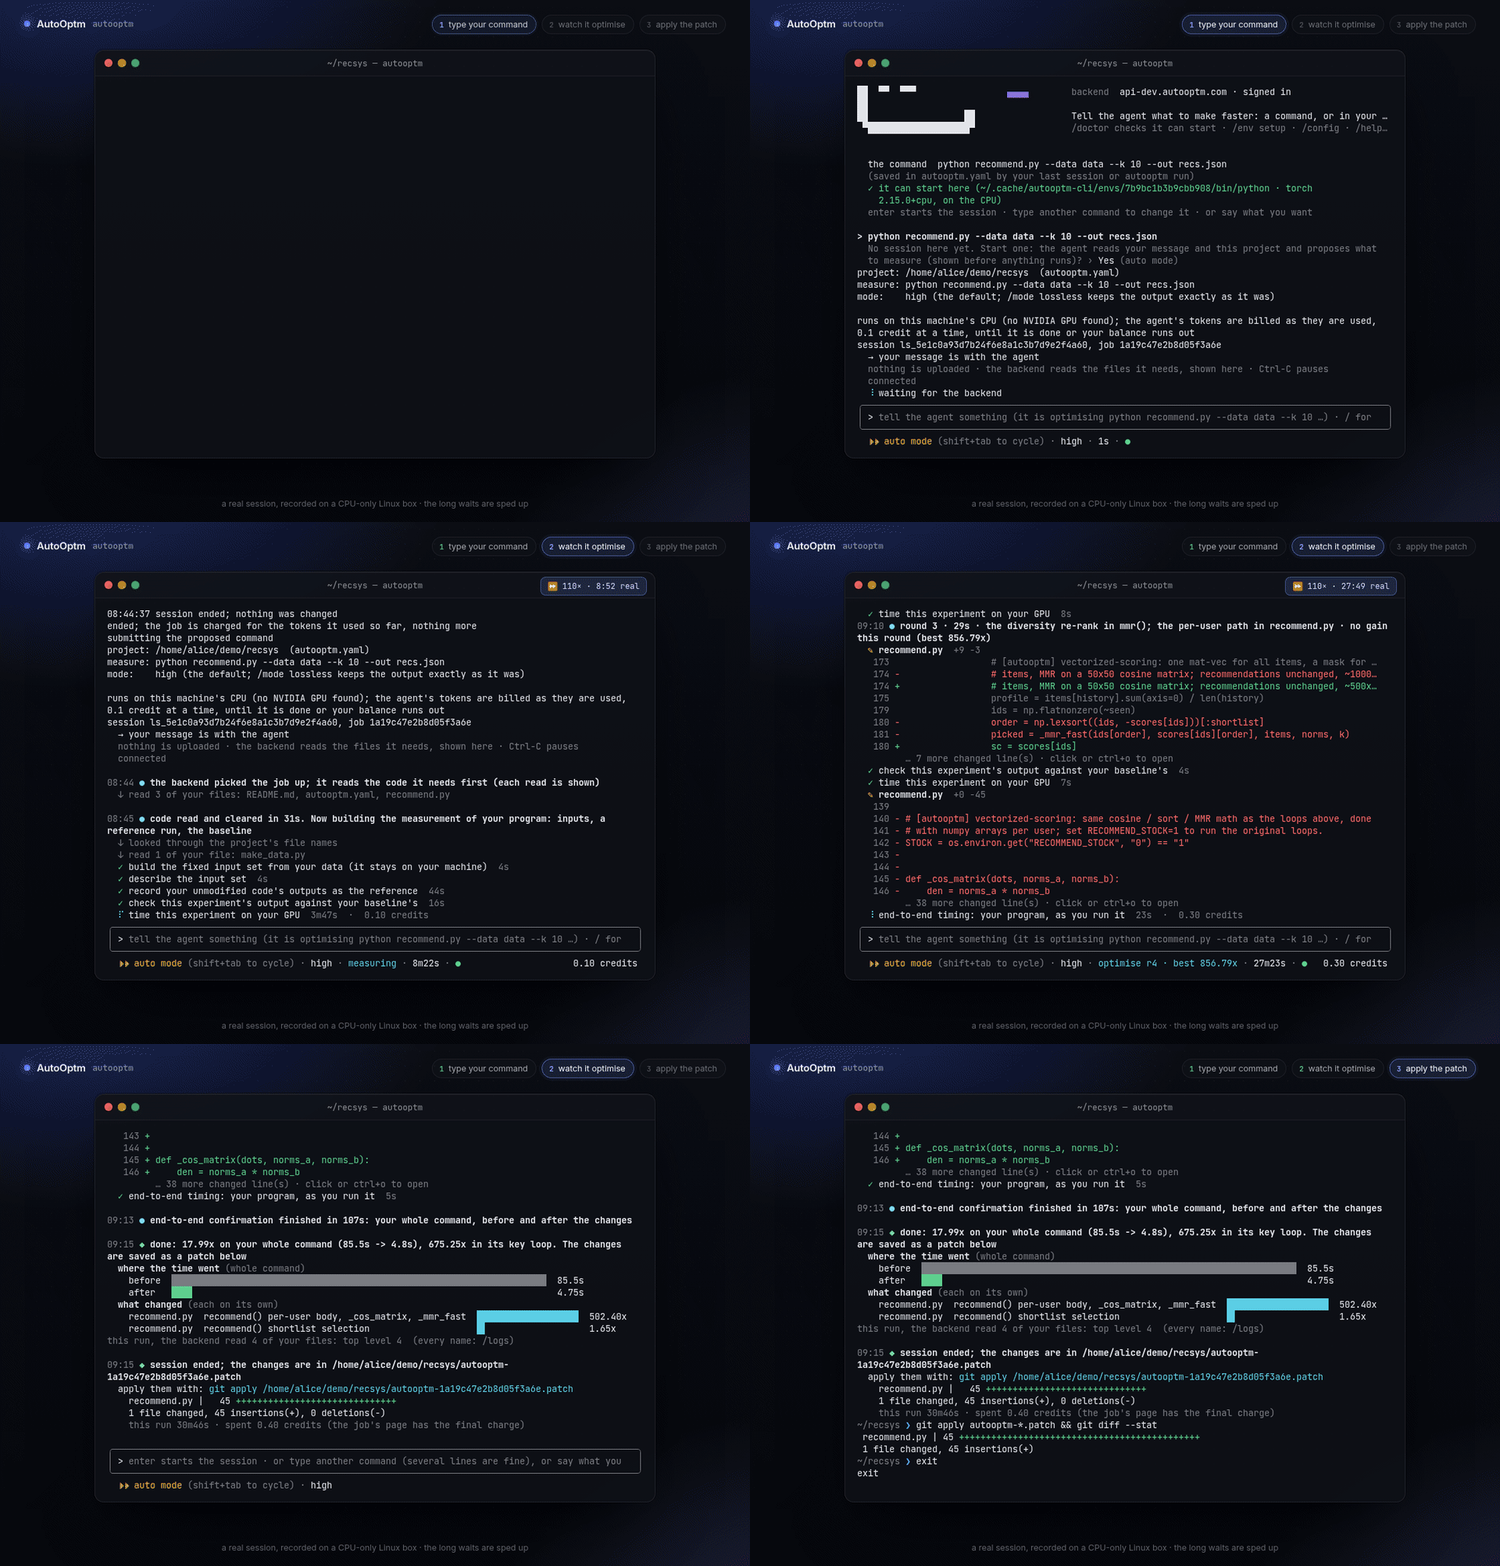
上手
$ curl -fsSL https://autooptm.com/install.sh | sh
$ cd ~/my-project                  # with the env your program runs in active (conda / venv)
$ autooptm                         # the first time: approve this machine in the browser

> python train.py --epochs 1      # how you run it, or what you want, in your words
不带参数的 autooptm 就是终端界面;还没登录时它先带你登录。打一行你平时跑程序的命令(可以多行),或者用你自己的话说要让什么变快,都会交给 agent:它读你的项目,定下要测量的那条命令,然后直接开始,按用量扣费,余额用完会暂停。要测的命令记在 autooptm.yaml 里:下次打开,它先在本机检查这条命令能不能启动(缺包、没有 torch 时会在它自己的隔离环境里装好,不动你的环境),直接按回车就能再开一个会话。
常用操作
| 输入 | 作用 |
|---|---|
| python train.py … | 不带斜杠的一行:交给 agent。可以是你跑程序的命令,也可以是你的话;会话中就是对 agent 说的话。要测的命令定下来后写进 autooptm.yaml,下次空着按回车(或 /submit)直接用。 |
| /submit · /resume · /end | 按 autooptm.yaml 开始会话;接着跑暂停的会话;结束会话,改动存成 .patch(会先确认)。 |
| /status · /diff · /logs | 会话在哪、花了多少;到目前为止改了你哪些文件;完整的过程记录。会话进行中也能用。 |
| /env setup | 在 autooptm 自己的环境里装缺的包和合适的 torch(有 NVIDIA 显卡装对应 CUDA 版,没有就装约 200 MB 的 CPU 版)。 |
| ! nvidia-smi | 在你自己的 shell 里跑一条命令,不离开界面。 |
| shift+tab | 在 auto mode(默认:后端要跑的命令直接跑,照样显示和记录)和 manual mode(每条先问你)之间切换;autooptm tui --manual 一打开就逐条问。 |
| ctrl+c ×2 · ctrl+d | 暂停会话(暂停期间不扣费);离开界面(有会话在跑会先暂停)。 |
例子
# a fresh machine: no torch yet, and the program needs it
> python infer.py --images ./samples
  ✗ CANNOT START: torch is not installed …  set it up now? › Yes   # → /env setup, in autooptm's own env

# the balance ran out and the session paused: top up, then carry on
> /resume

# step away: pause now, pick it up later (or on another day)
ctrl+c ctrl+c
$ autooptm
> /resume

# done: the patch is in the project
$ git apply autooptm-*.patch
测试版:Linux(x86_64 实测,arm64 有发布包)。macOS 可以连接,但不会在上面优化;暂不支持 Windows(可用 WSL)。按 agent 实际用掉的 token 计费,每满 0.1 credit 扣一次,不收机器费(显卡是你自己的)。
在我们的 GPU 上:run --cloud
run --cloud 接受公开仓库地址或本地目录(不写就是当前目录),走完整个流程:打包、免费估算、询问是否继续、等待结果、给出补丁报价。中途断线也没关系,任务会在我们这边继续运行,用 wait 重新接上即可。
沿用你平时运行的命令:入口脚本用 --entrypoint,其余参数用 --args。显卡选 auto 会在 RTX 4090 上运行,显存不够再选 RTX5090;程序不用显卡就选 CPU,不收机器费。
本地目录会先在你的机器上生成清单:权重、数据、大文件以及文件数特别多的目录会逐项询问你,确认后才上传。详见上传了什么。
几秒钟的静态扫描,不执行你的代码,也不扣费。输出预期加速比及区间,然后询问是否继续。
回答 y 扣 2 credits 分析押金,解锁补丁时全额抵扣;没有加速、或失败在我们这边时退回。回答 n 或不作答,任务就停在估算阶段,始终免费。
运行结束后输出端到端实测加速比和补丁报价。unlock 会再确认一次才扣费,补丁保存为 autooptm.patch,执行 git apply 即可。低于 1.10× 不卖补丁,押金退回。
$ autooptm run --cloud . --entrypoint train.py --workload training --gpu auto
skipped: .git (1), __pycache__ (14)
y = into the code archive · n = leave out · d = upload as the private dataset instead (sandbox only, 7 days, up to 1 GB, one per run)
  checkpoints/                 weight files: 2, 1.9 GB (.pt×2)  include? [y/N/d] n
  data/                        crowded directory: 1204 files, 310 MB (0 of 1204 files are code)  include? [y/N/d] d
  data/ goes up as the dataset, unpacked at ./data

packing 87 files, 1.4 MB before compression:
  src/                                         62 files     1.1 MB
  configs/                                     14 files      38 KB
  train.py                                      1 files      12 KB
dataset: /home/you/repo/data -> ./data in the sandbox
upload? [Y/n] y
uploading the code: 87 files, 412 KB compressed
uploading dataset [############################] 100.0%    310.0/310.0 MB
job 7f3c2a1b queued
  [00:00] queued (estimate)
estimate: expected 1.6x · range 1.2x - 2.3x · lossless 1.4x
next: autooptm decide 7f3c2a1b continue   (takes the deposit, credited against the unlock)
      autooptm decide 7f3c2a1b stop       (free)
continue? takes the analysis deposit (2 credits) [y/N] y
continuing: the deposit is taken and the job is queued for a GPU
  [00:52] running (run) · preparing measurements
  …
1.61x  (937.8s -> 582.5s)
patch: locked. unlock for 4.6 credits (autooptm unlock 7f3c2a1b)
report: https://api.autooptm.com/api/my/reports/…

$ autooptm unlock 7f3c2a1b
Unlock spends 4.6 credits. Continue? [y/N] y
charged 4.6 credits; patch -> autooptm.patch
apply with: git apply autooptm.patch
$ git apply autooptm.patch
autooptm wait <jobId> 继续等待,autooptm status <jobId> 查看状态,autooptm estimate <jobId> 重新查看估算。
上传了什么
提交本地目录时,打包在你的机器上完成,打包前会先扫描一遍。哪些内容进入代码包,由你决定:
| 类别 | 处理方式 |
|---|---|
| .git、缓存、虚拟环境、编辑器目录 | 直接跳过,只打印一行 skipped:。包括 __pycache__、.venv、node_modules、wandb、.idea、.DS_Store 等。 |
| 权重文件asked | .pt .pth .ckpt .safetensors .onnx .npz .bin .gguf 等,按目录列出,默认不传。 |
| 数据文件asked | 图片、音视频、表格、.npy / .h5 / .pkl、压缩包等,按目录列出,默认不传。 |
| 单个超过 8 MB 的文件asked | 逐个列出,默认不传。 |
| 超过 200 个文件的目录asked | 列出文件数、大小和其中代码所占比例。一半以上是代码则默认上传(如 src/),否则默认不传(如 outputs/)。 |
每组三选一:y 放进代码包,n 不上传,d 作为私有数据集上传。数据集走独立通道:只进沙箱,7 天后删除,上限 1 GB,在沙箱中解压到相同的相对路径,你的命令无需改动;每个任务只能带一个数据集。全部回答完后打印打包清单,确认后才上传。代码包压缩后上限 64 MB。
# only show the list; nothing leaves the machine
$ autooptm run --cloud . --entrypoint train.py --dry-run

# answer from the command line instead of the prompts
$ autooptm run --cloud . --entrypoint train.py --include checkpoints --exclude outputs --yes

# send a directory as the dataset, unpacked at ./data in the sandbox
$ autooptm run --cloud . --entrypoint train.py --dataset ./data --dataset-path data --yes
--yes 时,run --cloud 只打印清单、不上传(退出码 1)。建议先用 --dry-run 预览,再带上 --include / --exclude 和 --yes 提交。
命令参考
| 命令 | 作用 | 选项 |
|---|---|---|
| autooptm | 终端界面:在这台机器上优化当前目录的项目(没登录时先登录)。/help 列出里面的命令。 | tui --manual |
| run COMMAND | 在这台机器上优化这条命令,不进界面(行视图)。autooptm help 列出本地会话的全部命令:doctor、env、resume、say、end、logs、diff 等。 | --mode high|lossless--allow-all-commands--detach |
| run --cloud SOURCE | 在我们的 GPU 上:提交公开仓库地址或本地目录,并等待运行结束。默认先免费估算,再询问是否继续;--no-wait 提交后立即返回。 | --entrypoint main.py--workload training|inference--gpu auto|RTX4090|RTX5090|CPU--args "…"--setup FILE--git-ref REF--model opus|glm--lang zh|en--dataset DIR_OR_ARCHIVE--dataset-path ./data--include PATH--exclude PATH--dry-run--no-estimate--no-wait--yes |
| wait JOB | 继续等待某个任务,用于断线后或使用 --no-wait 之后。停在估算阶段的任务会再次询问是否继续。 | --yes--timeout SECONDS |
| estimate JOB | 重新查看免费估算:预期值、区间、lossless 档位以及审查备注。 | |
| decide JOB continue|stop | 对估算作出答复。continue 扣 2 credits 押金,stop 免费;7 天未答复视为 stop。 | --yes |
| status [JOB] | 带任务 id:查看云端任务当前的状态、加速比和报价;不带:这个目录的本地项目和会话。 | |
| unlock JOB | 按报价扣费并下载补丁。扣费前会先确认;实付不超过报价。 | --yes--out autooptm.patch |
| cancel JOB | 停止排队中或运行中的任务。已取消的运行不扣 credits。 | |
| balance | 查看可用 credits。 | |
| datasets | 列出本账号上传过且尚未过期的数据集,可以直接通过 key 复用。 | |
| login | 登录:打开浏览器授权这台机器;加 --email 则改用邮箱验证码。 | --no-browser--email ADDR--code NNNNNN--role … |
| logout | 删除本机保存的令牌。 | |
| keys create|list|revoke | 管理供 CI 和脚本使用的 API key。 | create NAME --scopes read,submit,unlock --expires-in-days N |
| install-skill | 将 Claude Code 技能安装到本机的 skills 目录,详见下文。 | --dest DIR |
Claude Code 技能
技能打包在 autooptm 里,无需另外下载。安装并登录后,一条命令即可把它装进 Claude Code 的 skills 目录:
$ curl -fsSL https://autooptm.com/install.sh | sh
$ autooptm login
$ autooptm install-skill
installed autooptm-optimize -> ~/.claude/skills/autooptm-optimize/SKILL.md

# somewhere else, e.g. a project-level skills directory
$ autooptm install-skill --dest ./.claude/skills
然后在 Claude Code 中打开你的仓库,直接说「用 AutoOptm 优化这个仓库」,或调用 /autooptm-optimize。技能会引导 Claude Code 完成整个流程:
找到端到端运行训练或推理的那条命令;不确定时会先问你。
--dry-run 给你看清单agent 没有交互终端,所以会先列出哪些内容会上传、哪些默认不传,经你同意后才带上 --include 和 --yes 提交。
只有你明确同意,才会执行 decide continue;否则任务停在免费估算阶段。
汇报加速比和报价,经你同意后再 unlock,然后 git apply。
autooptm login、autooptm install-skill;令牌不会随技能迁移。
环境变量与脚本
| AUTOOPTM_TOKEN | API key 或登录令牌;设置后不再读取本机保存的令牌文件。 |
| AUTOOPTM_API | 接口地址,默认 https://api.autooptm.com。 |
| AUTOOPTM_INSTALL_DIR | 安装脚本把 autooptm 放到哪里,默认 ~/.local/bin。 |
| XDG_CONFIG_HOME | 令牌文件所在目录的上一级,默认为 ~/.config。 |
非交互环境下的行为
凡是会产生费用或上传文件的步骤,都需要一次明确同意,脚本中用 --yes 表示。不带 --yes 时:本地目录的 run --cloud 只打印清单,退出码 1,不上传;估算出来后 run --cloud 打印 parked at the estimate,退出码 0,任务免费停在那里,之后用 decide 答复;unlock 直接拒绝。限流、网络抖动等临时性错误会自动重试;提交这类不能重复执行的请求,只有在服务器明确返回「稍后再试」时才会重发。